Well well well, it was such a pleasure reading all your sweet messages on my Kaleidoscope blanket! Thank you thank you ThAnK YoU 🙂
This is as promised, the ZIG ZaG Joining method…
Hope that my explanations will be as clear as possible for you to understand… I apologize for those of you who do not understand graphic patterns…this is my only way to explain crochet 😦 sorryyyyyyyyy 😦
So, let’s have a try, shall we?
To begin this is the graphic pattern of the small square:

and then lets take a look to the ZiG ZaG joining graphic:
 The red graphic is for the joining …You have every time to make a double crochet in your first square, 2 chain and another double crochet in the second square in EXACTLY THE SAME PLACE YOU DID THE FIRST ONE IN YOUR FIRST SQUARE !
Once this simple thing is clear all will become very easy to follow… Always always make a dc in the first square, 2 chain followed by another dc in the second square in exactly the same place…
I suggest for you, as a trial, to begin joining 9 squares to make a small blanket of 3×3 squares as in this pic:
 You have always to work as follow : Join all the squares of your blanket horizontally (A then B) and after you’ve made all your horizontal joining, you join all your squares vertically (C then D)
This method (joining horizontally everything then vertically) will make the joining very fast…I took some pics to make it clearer for you…
 Pic 1: Arrange the colors of your squares as you want them to be in your blanket … I made here 3 rows of 10 squares each (because I have a total of 30 colors )
 Pic2: Begin the horizontal joining of row1 with row 2 and then row2 with row3…etc
 Pic3: Continue joining row by row horizontally…until all rows are joined horizontally like in Pic4 below

Pic4: After all the rows are joined together horizontally, begin the vertical joining (here in this pic above, one vertical joining is done)
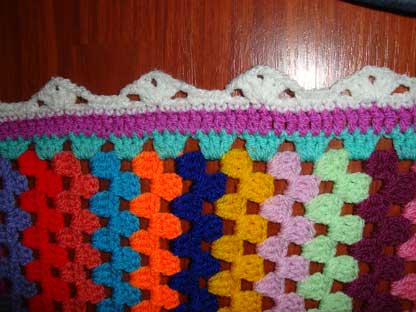
 Pic5: All the rows have been joined horizontally and vertically…time to begin the edging 🙂 (which will be explained in my next post 😉 )
Hope it was easy to understand…when you just read this post you’ll feel a little bit confused maybe, the best thing to do is to take a hook and some yarn, make 9 small squares and try joining them …
Thank you for visiting today!
Sending you lots of love through this post 🙂
Sucrette


Hello!!!
I’ve just discovered your blog and…I LOVE it!!!!!!
Dany
hello, il love your blog, and your explain to do the zigzag is perfect for me, i understand it and it’s more easy for more to see your pictures, thanks of lot, best regards, nath
I love graphic explenations, thanx 😉
Thanks for showing how you do this. It looks easy and it really looks good.
KATRIN W.
Hi Angie, love your Kaleidoscope ……the joining is so pretty and I love the small solid colour squares too .
It’s really gorgeous, no wonder your daughter loves it :0)
Jacquie x
Yaay, thank you for the chart, it looks very clear! Can’t wait to have a go at it! 🙂
Thank you for the graphics!
I made a sweater the other day, crocheted, where I joined the sleaves on top in the exact same way and it looks so cool!
This is the best ‘new’ way for joining grannies out there 😉 Good job! And gorgeous blanket! ❤
xo,
wink
I adore this, hopefully going to get a start on it today sometime.
Well what can I say? Your work is fantastic! I love your graphic patterns and am beginning to be more confident with them. I have been sorting through my stash of yarn this morning and this afternoon I shall have a break and try out
some little squares. Thank you soooo much.
Thank you for this fabulous tutorial!! of your cute and beautiful blanket. Your graphics are very easy to follow. Thank you 🙂
I realy, realy love your blanket!! Also the way you make them together is lovely. Thanks for sharing. Have a nice day! x Claire
it looks so great and it’s nice to see that the joining is so easy, now I’ll most definitely try it!
Thank you for your explanation! You did a wonderful job. I love your graphic pattern.
Have a nice day! Barbina
Thank you so much for posting your instructions – I must have a go – I love the way it looks!
jane x
Your explanation looks great to me, it makes perfect sense. Thanks so much for translating the graph for me.
Gracias, Gracias, Thanks!!!!. You are very generous. Kisses.
Hi there!
I just love your graphic patterns. They are great!
What program do you use to make them?
Perfect, Sucrette! Thank you so much for the graphic and all the pictures. Seeing all the pictures makes it very clear in my mind. Thank you again.
You do such beautiful work!
{{hugs}}
Cyn; -)
Gracias amiga, mas que claras tus explicaciones, las voy a tener en cuenta para trabajos futuros.
se ve hermoso y parece facil
gracia
s por el tutorial
besos anny
wonderful, I LOVE graphic patterns. It is so very well explained. Thank you for sharing.
FELICITACIONES por el blog! hacés cosas maravillosas! Éxitos! y muchas gracias por compartir!
Besos desde Argentina ♥
Thanks so much for sharing so quickly too.
Thank you so much for the graphic representation of your written explanation! Looking forward to seeing your post on the border, too! 😀
thank you for the time you spend to write out the instructions and take photos , much appreciated.
happy crafting.
Hi Angie, your kaleidoscope blanket is bright and beautiful! I’ve never seen this joining method before. I kinda get it but like you said, would definitely have to give it a go to actually get it. Love the way it ties everything together. Hope you have a great day. Tammy
That is just so beautiful and I love the little one color grannies in it. I might have to try this but first want to share my poncho inspired by your pattern…
http://allmyscatteringmoments.blogspot.com/2011/08/happiness-is-warm-poncho.html
Thank you so much for the pattern!
Greetings from Holland ~
Heidi
Me encanta tu blog, muchas gracias por el tuto desde ahora soy tu seguidora beso desde Argentina♥
It’s beautiful, I love all the bright colours on this blanket.
Your kaleidoscope blanket is gorgeous! Thank you for the pattern, I love your graphic patterns, I find them quite easy to follow. So, please keep doing what you are doing
Super, thank you!
Many thanks for the details. You are so talented.
Angie, this is just so lovely. Thank you for taking the time to provide us with very detailed instructions so we can all make one ourselves.
xo Susan
You are SOOOOOOO AWESOME! First, YAY for the finished blanket 🙂 And then, THANK YOU for always sharing your accomplishments and the patterns so we can all learn to do them as well. It means so much to share the love of crochet with everyone. This blanket is amaze-balls!!!
Wow. Thank you so much. I love it. I am going to make this one for sure. My giant granny is taking shape nicely
Thank you for giving all the details of this. I have this zig zag join in a book but in only covers it very briefly and there are no pictures. It’s nice to see how lovely it looks and have it fully explained. I think your blanket is very beautiful with all the gorgeous colours you have used. No wonder your little girl loves it so much! I am going to try join squares for my scarf using this method. xx
Do you have a picture of what the back side of this join looks like? I love this join method, but was just wondering what the other side looks like.
Thanks!
Sam
It looks the same as the front side 😉
Great! I might use this join for two round squares I have been making for a scarf!
Your work is amazing!!!!! Thanks so much for sharing.
Barbara
[…] Monde Sucrette describes a similar method here, although her’s is a single row of […]
Much too advanced for me, but wonderful to see what a person can aspire to. Thank you.
Very2 cute and colorfull ^_^ I just discover your blog, and many thanks for great patterns and tips sharing
Thank you for sharing your joining method! I’m looking forward to trying it out on the blanket that I currently have in progress. I’ve crocheted for years, but this will be my first joined blanket. Just one question, how do you know how much yarn you’ll need to join the squares? Is there a formula or way to factor it in?
[…] Je me suis inspirée de la méthode de Angie, Le Monde de Sucrette : zigzag joining. […]